Monday, February 26, 2018

WGR Cottage

My kit arrived on Friday and I put it together on Saturday. I was going to just do the walls but then I put the roof on too, because I wanted to see how much of a pain the angles would be.  I had the idea it would be difficult.

I was right. Sooooo irritating.


It's larger than I would have thought, but I like it.  Mentally I'm already planning where I can put it when it's done.  I've got a good idea though.

Here's a rough look at how it'll appear when I make my additions.


My dormer will be wide enough to cover the skylight opening and obviously the porch will be walled in.


You can see that if I want to make a second story I'll have to cut the front and back walls, extend the sides and I'll also have to extend the roof edges.  I think I'll be able to get away with using the kit's roof pieces though.

I think I'll end up making the front window smaller, maybe only two wide.  Cottages typically didn't have walls full of windows because of heating issues.  And glass was still expensive.


I like the windows, but I think I'm going to be altering them to be casement type windows.  I'll try to use the frames and then build a smaller inner frame on a hinge inside.

My secret weapon for building Tudor style casement windows is this:


My idea is to cut this to size, put the wire on either side of the glass, glue it in tight and then use Triple Glaze to give the 'glass' the Tudor look.


I've also got some casement windows which I'm planning to use on the second floor.


My other idea is to have one wall without windows, probably what would have been the left wall.  And I'll use that as the right wall.  It puts windows where I want them.


I think I'll end up either widening the window opening in the back wall and lowering it somewhat to use a casement window back there as well.

I'm trying to think of the logistics of the loft floor/porch ceiling and I think I'll have to cut the walls right above the loft slots in order to raise the roof and make it a true second floor.  I won't be able to use the actual loft floor because once I move the walls out an inch on either side it won't be wide enough.  So I need a new second floor.

It might be worth it to make a new front wall simply because the existing one will require so much done to it what with cutting it to make it taller and narrowing the big window.  And if I'm going to do that I'm debating extending the second floor out on the front as well.  Not sure about that.  I don't want it to be too busy and I'm already doing a Tudor style bay window like so.


I like that trim on the house pictured, though I'm not certain it's completely Tudor.  It looks like it was added in Victorian times.  So maybe some simple dark beams for roof trim to go next to the slate roof.

My other issue is the loft partition wall.  I need something to support the ridge beam, but I don't want the second floor divided by much besides the fireplace/chimney.  So I need to think up a solution for that.  Maybe some beam framing to support the upper part of the wall that faces the outside.

Since I'm not going to have a porch I'll need to fill in the slots for the walls.  But I'm going to end up putting flagstones down on the floor anyway so they'll be hidden.

I'm still going to need to cut a couple of walls though.  The right side wall with the one double and two single windows and also the back wall.  I need to cut a doorway into the back wall as well or there's no way to get to the second floor.  I suppose I could put a fake door in there but I want to be able to see the stairs.

Now to start drawing on the walls and figure out exactly where I'll need to cut.  This is going to be fun!  Nerve wracking but fun!

Oh, here's something for all of you Building Inspector fans out there.  I had the dry fit put together all of maybe ten minutes before the Inspection began.


She didn't go inside this time.  I'm sure that'll happen next time.

Saturday, February 24, 2018

All Lit Up

Just a quick little post to show you the Craftsman Tiny House at night.  I went in and turned on all the lights and then turned off the lights in the 1:1 house.


I was taking pictures with my cell phone so they're not the greatest but you get the idea right?  I sat and looked at it from my living room and was so happy.

And Keli left a comment on my last post about my new build and door widths.  For some reason the comment didn't show up but I couldn't stop giggling when I got it in my email.  Here it is.

iseecerulean noreply-comment@blogger.com

1:35 AM (7 hours ago)
to me
iseecerulean has left a new comment on your post "Its Here!":

So much fun, we've all got the latest toy!

Remember, in your excitement, that you don't design the base to large to fit through a doorway. :)


Posted by iseecerulean to Shenandoah & Stuff at February 24, 2018 at 1:35 AM

She was, of course, alluding to my issue getting the Architect's Abode into the closet for storage.  At least I think she was.  I mentioned that right?  Wow, lack of sleep really makes me a little goofy.

Anyway, in case I didn't, when attempting to move the Architect's Abode out of my main workspace, I realized that it wouldn't fit through the closet doorway.  I had to cut an inch off the front of the base to get it to fit.  This was after I'd taken the door off the hinges.


But I did manage to get it in the closet and now it lives there happily, free from the Building Inspector's investigations.

That is why I'm trying to keep the dimensions of the Wicked Queen's Retirement Cottage manageable.  It's not very wide so that's good.  I want the width of the base a bit larger than the cottage itself but not by a lot.  I've got some ideas for it.

Here's our last look at the Craftsman Tiny House for a while.


I'm more awake now that I've written something and had some caffeine. So I'm going to go play with my new kit!


Friday, February 23, 2018

Its Here!

You guys you have no idea how impatient I've been waiting for this kit!  I think I got spoiled with the kits arriving so quickly the last two years.

I just got home from work though so I haven't had time to take it out of the box and play with it yet.

The not so glamorous view.


Also arriving in the mail are things to live inside it.

A loom kit, Tudor style, from SDK Miniatures.


They didn't have it in stock, only a 1/2 scale loom but when I messaged them they said they had kits or built looms and which would I like!  So I'm going to try a kit and see how it goes.  This'll be fun.

And from Minimum World...


They're having a crazy awesome sale on barewood furniture and I splurged a little bit.  More and more I like having the ability to tailor furniture to what I'm building and barewood is a great way to do that.

Plus shipping to the US is free if you order fifty bucks or more worth of stuff.  Very cool.

That's pretty much it for me at the moment.  I've got to make some room on my table for the kit and figure out what I want to do for the base.  I love the idea of doing water up against one side of the house., so I need to figure that out a bit.  Do I want to have a front garden attached to the house or build it separately so I can store it elsewhere?  Or do I want it all attached to each other?  Careful planning required here folks.

Opinions?

Monday, February 19, 2018

Grand Prize Winner!

Congratulations to Kelly Havens for her Cottage by the Sea

Check out all of the pictures!  There are a few more on the site.  I think my favorite part is the front garden.


Talk about transforming the kit! 

Saturday, February 17, 2018

Still Waiting...and Revising

Like everyone else who preordered the 2018 Creatin' Contest kit I'm still waiting for it to ship.  I'm so bummed because I think by this time last year I had the kit and I got to play around with a dry fit and mess around with furniture inside it.

It was also good to get a sense of how big it actually was.  I can measure and lay out a flat board to my heart's content but without walls I really don't get a good sense of the space I'm working with.

So I'm crossing my fingers that the kit comes in on the 21st, which is the latest late on the site, and maybe I'll get it by the 28th?

I've been collecting cup trays and molded cardboard that holds toner and computer parts along with egg cartons so that I could have enough cardboard for my stone walls.

And I'm researching building structure so I can make the tower top and second floor as authentic as possible.


I've been playing with the floor plan and trying to think of a way to not cut off the length but make the house look less huge.  And Megan suggested a false wall to make the space feel more cozy.

I liked the idea but wasn't sure just how I'd pull it off.  It did get me thinking though.  I'd been reading a lot about Tudor buildings and it was during the sixteen century that people figured out how to build chimneys and more efficient fireplaces.  That led to the development of the kitchen, with the fireplace in the center of the room and serving as a divider between the 'entertaining' space and the food prep area.  In Medieval times the great hall was where food was prepared as well as the gathering and dining area.  Having separate rooms for different functions was really a modern sort of idea.

Since WG has some wealth available to her and added her tower and 'remodeled' her old cottage I decided she would have tried to 'modernize' it when she returned to it after her ungrateful stepdaughter threw her out of the castle when she married her prince charming.

So I thought let's put the fireplace in the center of the cottage floor and that'll take up space.  I also wanted to move the tower so it's more on the back corner of the cottage rather than behind it.

Here's the original layout I showed you.

Complete with a little Jack paw playing with the tape.
And here's the layout I think might work better.  The yellow and black boxes are serving as the fireplace.


The sink base will be narrower and I'm going to try and do a window that's more like a bay window in front of it.

I've also got an idea based on this.


I've got some chimney stacks and I got some plastic dragons so I might try to recreate this chimney stack.


I think I might want some bigger dragons though.  Thankfully they're cheap.

But maybe I could use the little ones on some beams or over the door?

I've got some wooden trim on order and I'm hoping to use it on the bed and maybe on the chest I want to build.

Here's hoping no more backorders for the kit!


Thursday, February 15, 2018

Congratulations!!!

I'm so excited! 

Just got the email announcing the 1st, 2nd and 3rd place winners of the 2018 Creatin' Contest.

In Third Place

Belmont House by Kristine Hanna of Paper Doll Miniatures

(I knew it I knew it, didn't I tell you so?)  See the little first time entry stamp in the upper right hand corner of the picture?  Can you believe it? 


In Second Place

Frankie's Garage by Sandy O'Grady

Another first time entry.  Awesome.


And in First Place

Quest Travel Agency by Sharon Elgin


Congrats to all the winners and if anyone has a blog let me know and I'll link up to it!

And congratulations again to Kristine! Knew you could do it!


Monday, February 12, 2018

First Time Entry Winners

So I'm a little confused.  Is it possible I'm too invested?

Kristine of Paper Doll Miniatures is not listed among the First Time Entry winners.  I am now convinced there's either something wrong or she's placed 1st, 2nd, 3rd or the Grand Prize.  Which would be awesome!

So I'm going to keep an eye out for future email notifications.

In the meantime, here are the First Time Entry winners.

Backwoods Entrepreneur by Bill Elgin


Beach Cabin by Connie Ness


Tin-Pot Robot Repair by Loraine Pansegrau


The Little Kite Shop by Cindy Parise (I think this is my favorite out of all of them)


Parrots Cove by Doug Payne


Muddy Waters by Anita Waters


Congratulations Everybody!

Sunday, February 11, 2018

Possible First Floor Layout

I've been thinking a lot about the size of the 2018 Creatin' Contest kit.  15"x24"x17".

The height doesn't matter much to me since I'm raising that.  But I wondered about the length of it and if I wanted to cut that off a bit.  So I got some furniture and measured out the dimensions on one of the base boards I have left over.


This doesn't really allow much for windows or anything but you get the idea.  The oatmeal carton represents the tower and the tape by the base its door.  I taped off 6x2 inches for a fireplace in the middle of the 24 inch length.   And at the front of the house a short wall to make a small entryway to prevent drafts from getting at the fireplace.

I really wonder if I cut about four inches off of the length if it wouldn't be slightly more realistic?  I don't really want it to be so spacious looking.

Jack did his best to help of course.


First he batted at the tape.


Very curious as to what I'm doing.


And trying to figure out the purpose of the oatmeal container.

But he didn't swipe at any of the furniture or jump on the table so we'll call that a win.

What do all of you think?  Cut the length of the cottage to give it a slightly more cramped appearance?  From a practical standpoint it would mean less work on making the stone around the house.  Though I don't have a power saw so cutting through the MDF wouldn't be easy.

We've gotten more chilly weather today and a threat of freezing rain, which is delightful.  Hope everyone is able to stay warm!

Thursday, February 8, 2018

Excited!

Hey guys!

I'm really excited to announce that the Craftsman Tiny House has received Honorable Mention in the 2017 Creatin' Contest!

I'm sure you all recall what it looks like. But here are a few pictures.


An Overhead look.


The Other Honorable Mention winners are:


A Writer's Retreat by Suzan Atabey


Stone Cabin in the Woods by Bonnie Cross


Williams Gallery by Mary Nadine Kalkwarf


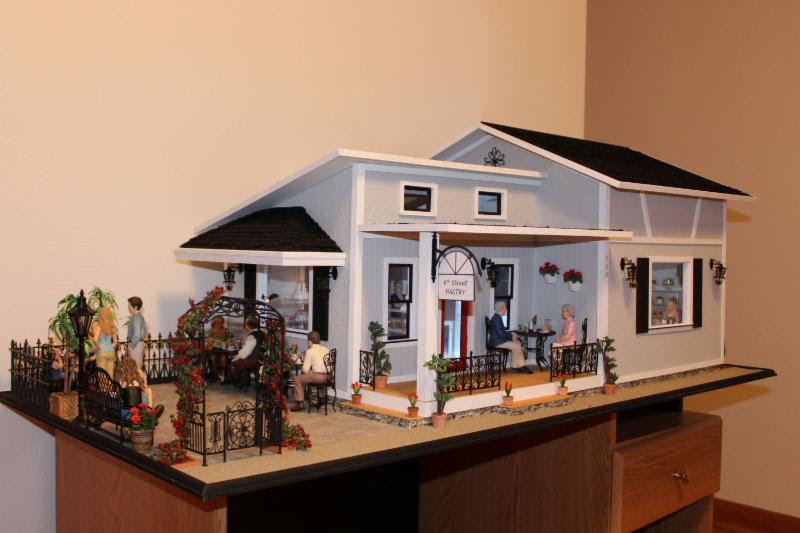
64th Street Pastry by Monika Lowder


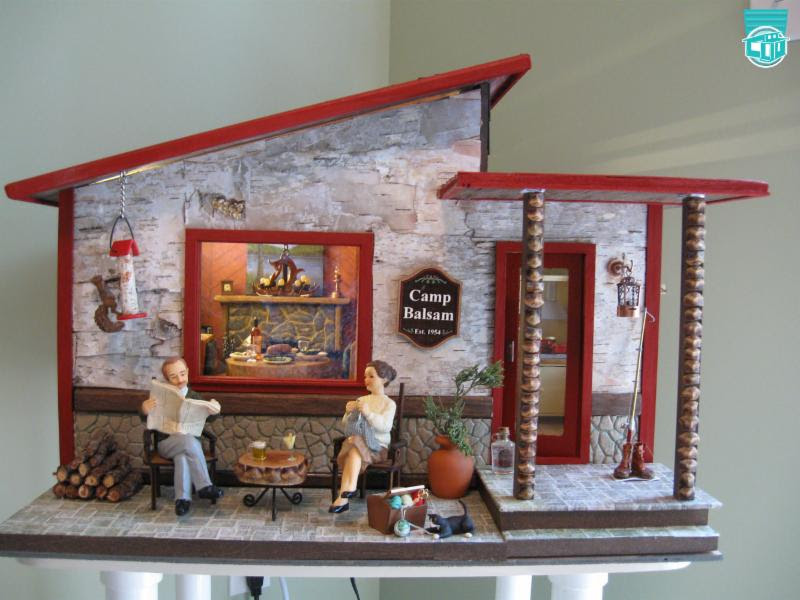
Camp Balsam by Karen Mason


The Susan A. Nancy Horticultural Library by Keli Minick.  I know she has a blog!  And...


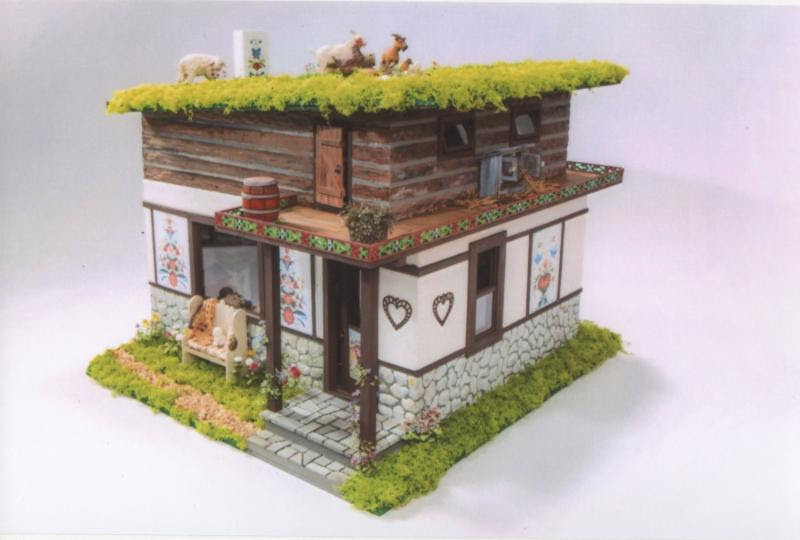
Old World Cottage by Barbara A. Schultz.

I don't know if any of the other winners have blogs but if they do please send me links! 

Congratulations everybody!  Now I'm going to go and drool over all the pictures on the HBS site.