Monday, November 30, 2015

Bedding and Towels

As promised, I did some more work on the house.  Little inside things mostly.  Like bedding for the master bedroom and towels for the bath.  Rugs... laundry baskets... that sort of thing.

The bedding is fabric I bought from the remnants section at JoAnns. 

Not bad looking right?
Making tiny realistic pillows is beyond me so I bought them from Otterine.  I love the little Owl the best.

Isn't he cute?
They come in sets of two so I used the extra one on the green chair in the sitting area.

Looks pretty good...I need to polish the side table though
I also made some things for the bathroom.  A roll of toilet paper, towels and I added a tissue to the tissue box.  Makes things look more real in my humble opinion.

Real paper.  Just in case you know?
And the towels are a very fine corduroy, pressed and glued into place.


You can see my tissue box in this pic. On the corner of the counter
And last but not least, the laundry basket.  This shot also gives you a nice look at my closet doors.

Well, not a great look, but you get the idea?
One more thing I did was install the garage door and the trim for the windows on the upper floor.

I like the contrast of the dark windows with the pale stucco. 
I'll try to take some more pictures so you can see the variation in the trim colors later.  Right now it all looks dark which is fine.  But the windows are actually stained a dark brown and the outer trim is painted the same black that's around the front windows.

One last pic
My two youngest enjoying the holiday.  Jack is the big old orange cat. He's barely a year old and still at that stage where he wants to sleep near his sissies.  Helo is on the floor behind him doing his evil dead impersonation. He's such a drama queen.  And Tali, my little calico is resigned to never getting the chair to herself.

Hope it was a happy holiday!  I'm back to work and trying desperately to get caught up.

Saturday, November 28, 2015

Stucco!

For some people Black Friday is when you go out at zero dark thirty to wait in line and get bargains.  That is so not me.  That will never be me.  As far as I'm concerned, this is a four day weekend that means I don't have to ever leave my house.  I should have gone and gotten my nails done and didn't because I was busy with the dollhouse.

Thanksgiving and Black Friday I used wood putty and plaster to fill in any little cracks and areas where the house wasn't quite structurally sound looking.

Then I used the Dollhouse Stucco to give the plaster and wood some texture.  I was really pleased with how it turned out. 

The texture isn't very easy to see here.


I like the contrast between the black around the windows and the off-white of the stucco and then the dark brown of the siding. 

I'm adding the trim around the garage and windows today and tomorrow.  Then it's back to the roof garden/patio and the details of the decorating.  And at some point I need to make a railing for the balcony.  That means another trip to Hobby Lobby for some wood or dowels.  I'm thinking squared posts and brass rails.  Simple so nothing looks too cluttered.

But that's for another day.  Happy Thanksgiving everybody.

Monday, November 23, 2015

Siding and Tiling

This was a labor intensive weekend for me.  I got the siding on the front of the house glued on and stained.  I'm pretty pleased with how it looks.

Not too bad I think
 
And then I started to work on the living room floor.  I got the tile glued in and the floor supported so it didn't warp.  Then grouted my tile.
 
 
I need to wipe down the tile one last time here

 Then it was a matter of clean up and getting the baseboards and stairs glued into place. 


Pretty pleased with how it looks
The stairs still look odd from this angle.  Here's a better one.


Now the fun part. Furniture! 


My husband loves that the dollhouse has a gaming console. 

The couch is from Mod Pod Miniatures and the sideboard is from Minisx2.  The little throw pillows are from Otterine.  I got the chair and ottoman off of Ebay along with the TV, remote and rug.

I'm going to find some artwork for the wall above the couch and brighten up the place a bit.  But overall I'm pleased with how it's turned out.

Wednesday, November 18, 2015

The Roof (continued) and the Platform Bed

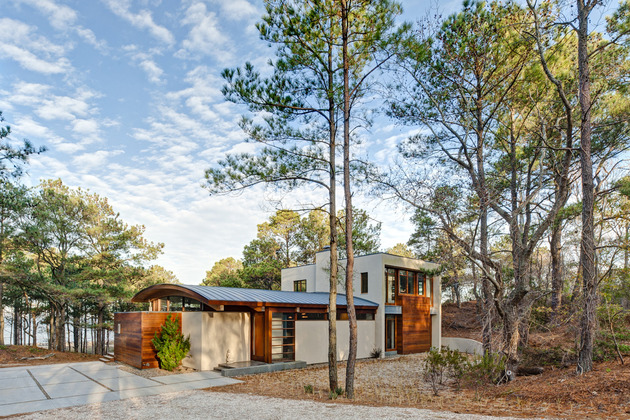
My inspiration photo shows a house with a metal roof often found down here in Texas.  I really like how these look and they come in a variety of colors.  Near my old job in Irving there was a white building with a blue roof.  Very appealing visually.

Here's a link so you can see more of the inspiration house.  Love it.  Contemporary Forest House.


curved-roof-house-of-natural-materials-responds-to-surroundings-3.jpg
Can you see the ridges and lines?
I've done this kind of roof on my Beach Bungalow and so I knew exactly what I needed for it.

Lots of thin strips of wood.  1/8th by 1/16th to be precise. 


They're so thin they bend easily.  And that's helpful for a curved roof.
You can see how well it worked on my Bungalow

All aged and everything.  Looks pretty good I think.

But I wanted a more metallic gleam to the roof.  So I got some metallic chocolate brown paint.  I didn't like how glittery it was though.  See?

Almost sparkly.  I do not want and Edward Cullen roof. No.
So thus began the process of aging and de-sparkling the roof.  Black metallic and espresso brown paint diluted with water and dripped/brushed onto the roof.  Using the water makes it gather and run in realistic ways, kind of like real weather would beat at the roof.

It was raining and icky for the last couple of days so I could have let the actual weather do the work for me but even I'm not crazy enough to try that.

A bit better right?
Then I let it dry and added some trim to the front and back, and did a bit more aging.

Still a bit of a gleam but not too bad.
The last bit of trim had to be added and I'm waiting on the glue to dry.

Slowly but surely, it's coming together.
I did find a picture of my windows for the master bedroom, I knew I had one. Just forgot to upload it.  Absent-minded? Me?  Naw...

Here we are.  I can't wait to put the white stucco onto the wood. The contrast'll be awesome.

I also, while waiting for the roof to dry in between coats of paint and gluing, got the platform bed stained and varnished.

I'm pretty pleased with it.
Here's another angle.

Not perfect, but pretty good for my first attempt.
And that's pretty much it folks.  I have some more painting to do tonight for that last bit of wood trim, and then its full speed ahead on the roof/garden/patio.  I'm looking into making some furniture for that area since I only have a couple of pieces.  But it should be fun.

The only issue? 

The area is rather...exposed... to cat inspections. 

Cats who have a history of stealing my flowers and electrical tape.

So we'll see how this goes.

Monday, November 16, 2015

Little Bits & Fiddly Things. And the Roof

 
So this week I got a lot of little things done on the house.  It feels like I keep taking pictures of the same thing over and over again though.  Weird huh?

First thing was the windows.  I got those all installed and glued.  And then painted for a little contrast with the walls.

I cannot figure out why that white shows through the siding.  I've even painted and it still shows.  Weird.
I've got windows on the other side of the house too.  Remember that hole Tali was looking out of when she inspected the bedroom?

Window area.
That is where the windows from the original kit ended up. 
See? All nice and glued in.
 
Then there was the matter of adding trim.  I didn't want the traditional trim that came with the windows.  It didn't look terribly modern to me.
 
So I got some strip wood and started to fool around with it.
 
 
Could have sworn I had a picture without tape. Oh well.  Tomorrow I'll take another one for you.

And here's the window in the office/studio

I like the contrast of the dark windows and the light wood.
I also got all my lights wired in, black outlines for the windows painted and the raw wood edge of the balcony painted.  None of that is really picture worthy.


Not super noticeable but it gives a little more contrast.

And you'll notice in the picture above that I got the curtains done for the master bedroom.  I'm not sure if I want them in the office or not.  I'm debating.  I'm thinking not.

But here's a couple more pictures of them.  And some of the kitchen curtains too.


I love the colors but the bagginess is something I'm still debating.

Ignore the view please.
 
I like this shot for some reason.


One last view from outside.
I also got the bed stained, its waiting on some varnish now. Needs to dry completely.  Then I'll have pictures for you.

But the master bathroom only needs the towel rods and towels to be completely done. The toilet and tub arrived and I'm pretty pleased with how everything looks.


Then I started work on the roof and ceilings.  I got them glued down, and the curved roof is currently clamped with the wood drying into the proper shape. 

Lots of glue, strips of thin basswood and lots of binders, plus a magazine to weigh everything down.
I'm hoping that'll be dry by tonight and I can work on glue the 1/8th by 1/16th strips down for my metal roof effect.

If I can get that done tonight, I can paint and then concentrate on the roof of the squared off part, which is gonna be a type of roof garden/patio.  And in between drying stuff I can get the siding finished off on the curved portion of the house.

It'll be a busy week but I'm making progress. And I ordered another transformer because I think I burned mine out.  This one should be capable of supporting more lights.  Yay!


Thursday, November 12, 2015

Siding! And the Inspection Continues...

Very excited that the siding for the main curved wall is up.  I got the siding from Hobby Builders Supply and had a real issue with them not remaining flat when glued.  So I glued them to foamboard and spritzed them with water before pressing them under heavy cookbooks and magazines to make them stay flat.

Then I repeated the process after I stained them. 

Some strip wood painted black to hide the foamboard around the lower window, sticky tacky glue and lots of binder clips... 

And voila!

Lots of binder clips
The board has the tendency to curve a bit still so until I'm sure the glue is completely dry the clips and tape are staying on.

One more shot


I also did some work on the roof for this part of the house. 

I'm using cardboard because I don't have the tools to quickly rip down the kit roof to the proper size.  But its card board that'll be sandwiched with thin basswood and I think in the end with trim it'll look great.

No pictures yet, mostly because I want it a little more finished looking before I expose it to the world.  But I got the plaster ceiling paper, the chandelier lights and the porch roof underside all glued on.  So progress right?

Also, while I was busy with my siding and binder clips, Tali decided to inspect the bedroom.  This is the reason the dollhouse will (eventually) be completely enclosed.

I like the cork floor Mom, but the bed is too small.
My husband keeps saying that she knows that I'm always working on 'whatever' this thing is so she's curious and she wants my attention.  Right.  This is the cat that loves on him all the time.  Me? I'm just entertainment and interesting jungle gyms. 

Mom, I don't like this window either
Yeah, that's enough of your opinion young lady.  Out of there.

See you all later, here's hoping the roof works as well as I hope!

Monday, November 9, 2015

The Master Bedroom and Bath

Well I think I'm doing okay on the house so far.  This week I've made some progress on the master suite.  The bathroom is just awaiting the tub and toilet and for the ceiling to be permanently fixed into place. 

I started working on it last week and you've all seen the walls with the little transom window I made to let some light in.


I'm still pleased with this wallpaper at least.
I installed the tile and got it grouted.  I really liked this tile when I bought it but I couldn't find more than one square foot of it.  So sad about that because it really is gorgeous.

It reminds me of mother of pearl
I also added the tile to one of the walls for the shower.


Grout and a lot of waiting for the grout to dry came next.  I swear half my life is waiting for something to dry. Glue, paint, grout...etc.

But then I had to make a little pony wall with the glass for the shower on top of it, and the shower enclosure itself.

I used some fixtures I bought from Elf Miniatures for the showerhead and drain.  I liked the idea of a double headed shower.

Can you see the control lever?
I built the shower enclosure out of wood and then varnished it and slid some thin plexiglass in for doors.  Not easy to see but here's a picture anyway.

I used another brad for the shower door handle. 
I've attached the sinks to the console and added the mirrors to the wall.  I'm pretty pleased with how it looks.  The sinks are also from Elf Miniatures.  The console is from ModPodMiniatures.  Love the modern furniture.  So beautiful.

I like the echoes of white from the grout to the porcelain.
The toilet will go behind the pony wall and the tub in the empty spot in the foreground.

The tricky part was getting the crown molding up.  It never wants to stay glued right away.

But it still looks pretty good

Speaking of bathrooms, here are a couple of shots of the finished half bath on the first floor.  The sink and washstand are both from Elf Miniatures.  I made the towels out of flannel and the mirror is from Ebay.
I like how it turned out.
One more.

It turned out pretty well. Small but nice.
Master bath mostly done I turned my attention to the bedroom.  First to the flooring and then to the trim.


A shot through the front windows to show off the cork floor, I need to dust I think.
It didn't help that the wall was trying to curve.

My sophisticated clamping technique.
 
Here's a shot of the window wall with the trim clamped on.


My very important glue bottle there.
Getting all the walls into place required some muscle and stubbornness to go with the glue but I finally got everything pushed and taped into place.

With all the trim and everything!
I'm still working on the curtains for the windows.  I'm not going to have working curtain rods, they'd never stay up. So I'm going to cheat and glue the curtains and some fake rods into place.

But the big thing for this room that I wanted was the bed.  I've seen some gorgeous modern beds out there with benches and night stands build right in.  So I wanted to do something along those lines.

I got a mattress from HBS Supply and used that to give me the approximate measurements.

Here's the start of the process, basswood and plywood.

Lots of glue!
Here's a shot about halfway along the whole thing.

Doesn't look like much does it?
And here we have the final product, minus the varnish and stain.  I'm thinking a dark base and natural wood for the top.

I'll take the tape off when its done drying.
A slightly different shot.


The mattress will sit in the middle where there's no trim
I'm pretty pleased with it so far.  Once I get the stain and the varnish on it'll look real nice.  Then the bedding and the bedroom will be halfway done.

I also was working on the ceilings for the rooms and got the plaster paper and lights on, but since I haven't done the curtains yet I don't want to glue it into place.

Here's a shot of what it'll look like completed. (Hopefully!)

I love a chandelier in the bathroom.  Very posh.
And because I can't have a flat surface without the building inspector coming by...

Tali isn't sure she approves.
One more look just to see...hmmm... No... Mom I won't fit in here. You'll have to start over.

Tali, the house is not for you.
So assuming the ceiling survives her 'help' I'll hopefully get the curtains in and then glue the ceiling down.  Then its just building a little set of walls around the top for the roof/patio area.

I also started to work on the siding for the curved portion of the house but its being held in place by several large heavy books so the siding doesn't curl up with the moisture of the glue and then stain.  With some luck I'll have pictures in a few days.

That's all for now folks.  See you soon I hope.