It occurred to me that I really had no excuse for not posting pictures and progress of my contest house to the blog. It's not like I have so many followers that someone will see what I'm doing and steal the idea. I'm also pretty certain that my idea is not so original that it would be instantly grabbed.
So I started out with this as my inspiration picture.
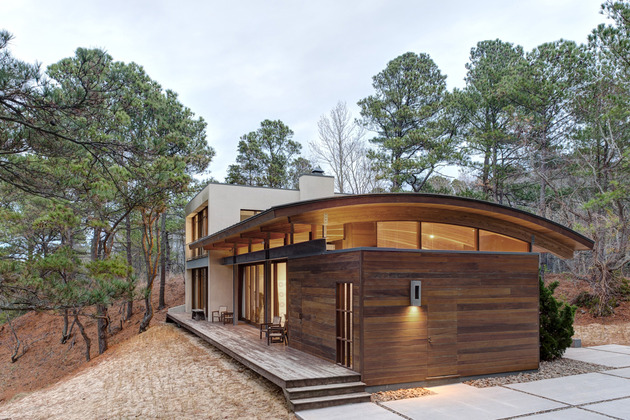 |
| I'd love to recreate those wood tones |
I really love the contrast of the curves and angles. I can't recreate this perfectly but I can get the look. And I wanted a two story house with a roof garden area. Or at least a roof patio.
So I got my baseboard and build my foundation.
 |
| Very bare bones |
You'll find that since this is the first 'from scratch' house I've built that I've goofed some things up. For instance, I put the subfloor over the foundation without running the wiring first. Not well thought out. But that's what wood putty and glue and stuff is for.
I was pretty definite that I wanted an attached garage, which is why the foundation doesn't cover the entire base. I did remember that I needed a place to hide the wiring though. Yay!
And I messed around with ideas for the flooring. The tile shown here has a nice sorta khaki green along with creamy brown, beige and gold...Very modern and it'll go nicely with all the colors I have in mind.
I want a sort of Brady Bunch house staircase, but without it taking over the entire room. Seriously the living room in that house seemed tiny with that staircase taking over. Great focal point, awful function.
The sectional couch is nice but it also takes over so I have something else in mind for the living room now. I want a very modern look. Angles and curves, like the outside of the house too.
Toward that end, I started to work on my walls. Lots of windows. That means lots of plexiglass cutting... Always makes life interesting.
 |
| A nice bump off the kitchen for the dining area. A door to the garage, the front of the living room windows... |
I had the idea that I'd make some of my walls, interior and exterior, hollow so I could run wiring through them. I did that with the walls that surround the stairwell and make up the bathroom and that'll make it easier to run wires up to the second floor without trying to hide them in beams or under wall paper.
I'm going with round wire here, rather than tape wire because tape wire was so awful on the Bungalow. I might be brave and try it again but between the tiny brads, the tape wire breaking and the bulbs burning out from testing... yeah, not thrilled with it.
Here's another look at the first floor walls.
 |
| Other side of the living room and the door. |
Then I got the bright idea to work on the garage and front porch. Mostly inspired by some things I found at Hobby Lobby.
 |
| Looks like a real garage, with junk inside it huh? |
The 'two by four beams' are just balsa wood, glued to resemble the framework of the garage. The back wall is on hinges so I can open it to paint and do the wiring for the upper and lower floors.
Experience with the building inspector (see below) had led me to believe an enclosed dollhouse is the safest dollhouse.
 |
| What? It's the perfect size for me! |
Especially as she's convinced her little brother that dollhouses are the most awesome things and that they're hers. Again, see below.
 |
| Yep. Inside the plexiglass case, on top of the dollhouse. |
So I've gotten the idea that I want to enclose this house completely. I can't stop her from sitting on top of it, but I can try to keep her from getting inside.
I've gotten the garage door added on.
 |
| Also second floor work has begun |
Picture taking was a bit sporadic for a while, I was so busy doing I forgot to take pictures.
But here's some of the end results.
 |
| Second floor laid out and a piece cut out for the stairs. |
The front porch is wired and the porch lights created. Made them out of drawer pulls, believe it or not. The round glass knobs were perfect once I took out the screws and I love the globes contrasting with the dark angled wood around them.
 |
| A jewelry finding conceals the hole at the top. |
All three of them in a row...
 |
| A little blurry, but you get the gist. |
And here we are, all lit up...
 |
| They are very bright. LED bulbs are wow bright. |
Here are a few pics of the furniture and the layout now that I had walls up. Funny how walls make the rooms seem smaller...
 |
| Living room... A little crowded and closed in feeling...really not liking the sectional |
 |
| Half bath under the stairs |
 |
| Top view of the kitchen... layout will change probably |
 |
| The vehicle isn't final either....and the potting bench needs a sink. |
Then it was time to start (at the very least) working on the layout for the second floor. I had to cut some of the length off the curved walls and add the notches again. I cut the length off the back of the walls so I could keep the high ceilings I associate with modern houses.
I also needed to shorten the width a little, or the cube/curve layout would be goofed up. And while I was waiting for the glue to dry and figuring out how to run the wires up to the second floor, I decided to work on the garage.
I bought stain and paint, a nice weathered grey stain for the 'beams' and a walnut for the eventual use on the wood siding of the house. Inside the garage I used a chocolate paint, watered down a bit to get a slightly aged look. Once I stained the beams I sanded them lightly so they wouldn't look too thickly painted.
 |
| Garage door needs some stain too I think. |
I found the most awesome light fixtures on
Mainly Minis that look like bare light bulbs. Perfect for the garage or an attic. I drilled a little hole for the wire into some of my channel beams and glued the fixtures on. Love!
 |
| Even looks a little dusty. |
Then I painted the garage door and glued the beams in place, after getting everything wired together. Wow... mental note, go get more electrical tape. I don't have a soldering iron so I have to use tape.
 |
| Looks kinda like a real garage doesn't it? |
I'm not entirely sure about the paint/stain on the wall above the garage door...looks odd in this light. I think it needs another coat of brown.
The rest of my progress... well not really picture worthy. I'm actually a bit excited because I think I figured out a way to get more wiring up the stairs. But I need to build the rest of the outer walls before I can do the inside. And I've got to stop at Hobby Lobby and get more drawer pulls. And bronze jewelry findings.
But that's what I've got so far... Hope you all have enjoyed this. I'm planning on getting more done this weekend.


