Monday, July 21, 2014

Forays Into Tiling

Yes, I've been tiling!  This is new for me.  And when I say new I mean really new.  I've never put ceramic tile in a real house.  I've never put flooring of any kind in the real house.  I know what I want but I have no idea how to make it happen.  No matter how many home improvement shows I watch I always get hung up on the expense, the tools needed, the sheer amount of labor involved.

Not to mention the cats and the furniture that would need to be moved.  Yeah.  The whole exercise seems more than a little labor intensive.  Not a one person job.

But a dollhouse... that's a little more managable.  As you saw in the Gothic Victorian, it's usually one legal sized sheet of glossy paper or wood veneer that you glue down.  None of this prying up the baseboards, ripping up carpet stuff.

It helps that you can hold an entire rooms worth of flooring in one hand.

So what I need for my own house is a friendly giant who'll pick everything up, put in new flooring and then put everything back.  Do I have any volunteers?

No?

Oh well.  Back to the dollhouse. 

I've been very excited about the bathroom.  I wanted to make it a little more realistic and that mean actual tile not the sheet plastic stuff I used in the Gothic Victorian.  I like how the big dollhouse bathroom looks but I want the Bungalow's to be different.

So I bought some miniature tiles.  They're about three eighths of an inch square and come in a sheet with a paper backing on what will be the front of the tiles.

My biggest problem was figuring out what to use to stick them to the wall and what I could use for grout.  Rummaging around my cabinets netted me some cauking for the bathroom, in an unopened tube.  Yay for plumbers who put in new faucets without needing cauk.

I cut a section of tile and squeezed the cauk onto the backs and pressed it to the wall in the right spot.  This can get messy with too much adhesive but the tiles won't stick if you don't put enough.  So a few attempts later and I got it to stick. 

I got another strip for the floor around the tub and a few more smaller strips to extend the area back towards the eaves. 

See how I got some cauk on the ceiling?  Luckily it wipes off with water and a cloth.
And then I had to let it dry.  That takes at least a couple of hours so to occupy my time I did a few other things.

I got creative with some little square beads.  They're glass and remind me of tiny mosaics.  I wanted a boarder along the top of the white tile.  So I got my cauk and started to put them in place. 

See? Shiny.

And I got a little...enthusiastic.  But I think it turned out well.  Gives the bathroom a little pizzaz.

I was very excited by this.

Wallpaper for the bathroom, as is hinted in the above photo.  We're going with more scrapbook paper here since I wanted something more modern than the flowery paper I used in the kitchen of the mansion.  And I also wanted the wallpaper to feel a little dated.  Like it was the height of casual fashion in the seventies and hasn't been updated because it isn't too bad and still looks good.

I thought about brown, but it seemed like it would end up too dark.  After all this bathroom has no windows at all.  We want to look a bit dated. Not dingy.

Voila.  Instant Wallapper.  I've got three sheets of this. More than enough for the bathroom.
So I got my wall and traced the dimensions onto the paper and then glued it on.  Good old Elmer's glue again.

It looks nice and bright doesn't it?  Cheerful.
I glued the wall into place with Sticky Tacky glue for the upper edges and Elmer's for the floor edge.  And since I was at it, I put in the bathroom door. All of it has to sit for a while so the glue can set and I like to accomplish as much as I can in one space of time.

So Sticky Tacky glue to the rescue and the door is installed.

See?  Nice and bright.  I really am liking this Summer Oak stain more and more.
A quick word on the door.  I thought about it and realized that if I positioned it so that the door opened into the bathroom it would be very awkward for spacing.  It would very narrowly clear the sink since its such a small space.  So I changed it and now the door pulls open instead of pushes.

I think it works pretty well.  It's something I didn't consider in the Gothic Victorian and I'm glad I remembered that with this house.

And we must have doorknobs.  It's so weird, the Victorian had six doors to stain and install not including the front door.  This house only has one.  So benefits to an open space modern home.

See the doorknob?  It sort of matches the one on the front door.
Oh, you can see some of my little extra tiles in the picture above.  Thats them with the back face up.

While I was letting all the glue dry I decided to paint and glue the window frames.

This was an interesting process. The instructions call for you to glue the frames together and run a rubber band around the raised edge to hold everything in place.  In a house with cats rubberbands are like an endangered species!

Seriously we don't have them.  We get rid of them if they come in the house because we're afraid of the male cat (who shall remain Helo) eating them or pieces of them and then needing surgery on his intestines.

So I taped and held the outer frames in place until the glue was somewhat set and then did the same to the inner frames.

See? neat huh?
I do like how nice and big these windows are.

I neglected to take pictures of me painting and adding the mid window supports but here's a couple of shots with them glued into the house.

A little blurry but you get the idea.
As you can tell from the reflection I glued on the plexiglass too.

I'm a little irritated with myself.  Once I put on the inside frames I realized something.  See if you can figure out what I missed/forgot.

Notice anything a little off?
Here?  See? It bugs me.
My OCDness is bothered every time I look at the windows.  They don't match perfectly.  Because I forgot to stain the side of the supports that would show through the windows into the house.

I could kick myself.  I thought about pulling them down and fixing them but I'm more than a little worried I'll break the wood or the 'glass'.  So I'm making myself live with it.

One more reason to get the curtains up.

But by the time I'd gotten all of this done the cauk was mostly dry so I could use a damp cloth to remove the paper backing from the tiles.  It got really wet.
 
A few of the tiles popped off. Cauk needs to dry completely or it won't stick.

But I glued those back down and let them dry while I fiddled around with the tiles near the eaves.

I ended up putting a few little tiles in so it looked smoother near the roofline.
And I realized something as the cauk was drying again and I tested how everything would look with my little sink.  I wouldn't have a level floor unless I either tiled the whole thing or I figured out a way to raise the floor so it was equal in height to the tile.

I really didn't want to tile the entire bathroom floor.  For one, it would make the tile around the tub area not stand out as much.  For another, I didn't have enough tile.

So I started to figure out other ways to raise the floor. (Hey that rhymes. LOL) 

Did you know that cardboard is a very helpful handy thing to have?

I cut out a piece to match the room and then cut out chunks to accomdate the tile and the doorframe.

See? Almost perfect.
And when I had it right I glued it down to the wood floor.

Now when the wood goes down it'll be level with the tiles.
That problem taken care of it was onto grouting.

Uh, I didn't have any actual grout.  I didn't even have any dollhouse grout.  What to do what to do...?

Go rummage through my cabinets and see what I have leftover from house repairs of course.  Seriously guys, its a good thing I don't throw stuff away until I'm certain its useless.  The spackle I found needed mixing because the liquid had started to separate but it was nothing a little elbow grease couldn't fix.

On a side note, my doctor would be pleased with me because every time I do some project for the dollhouse I end up with my heart rate increasing and I feel like I'm sweating like a pig.  That's an attractive image right?  Who came up with that saying anyway?

I'm told that in the south Ladies glow and Gentlemen perspire.  I have no idea what species that makes me.  Probably not a lady.  Unless by glow they mean red in the face.

But back to the workout I had remixing my spackle.  And I did not have a spackling knife or putty knife or whatever that thing is that looks like a huge flat screwdriver blade.

I used a regular butter knife.  And it worked pretty well both for mixing and applying the spackle as grout.  See?

It isn't perfect. But perfect is boring.

I like how the white spackle/grout makes the colored tiles stand out.  Here's another picture of the whole thing.

Excuse the shadow.  Picture taking is not my strong suit. Obviously.
One more detail shot.

You really see the little colors here.
And then I had to let the spackle/grout dry.  But I tested the level of the floor with my sink and then got to thinking about a backsplash for the sink. Sooo...

I neglected to take into account one little thing however.
If I put a mirror over the tile it's too high for a doll to look into.  And the lights would go above the mirror.  Soo...

Let's make that backsplash just a little narrower shall we?

Not perfect but better.
There was a lot of waiting for things to dry.  Have I mentioned I'm not so good with waiting?  Yeah... so I started doing something else.

One of my house 'wish list' projects is wood flooring.  And not just any wood flooring.  I want the wood to run diagonal to the walls.  I saw this on a home improvement show and it makes the rooms look huge.  I'm sure there's a technical explanation but I just know I Like.  Lots.

So I got to work on the bedroom.  Yet another cardboard template of the floor later and I was happily glueing (rubber cement this time) my floors down.

I'm so thrilled with how this looks.
I mean it's so pretty.  And different from the first floor.  Slight color change, variated boards, and the angles... Husband laughed at me when I was just petting the floors.

But I put a coat of finish over them.  It's not supposed to make everything super shiny, just give it a nice gleam.  Hard to tell in the pictures though.

So pretty!  Can't wait to get the baseboards in.
And while that was drying I could go back to the backsplash and clean it up and spackle that.


See?  Just the right height.
 Here's a slightly better shot.

Fun part was figuring which tile to put where for the edges.
Then I got the floors into the bathroom.  No diagonals here, just straight boards.

I've got a little edge showing near the door but I'll fix that along with some other finishes.
While that was drying.  Lord there's a lot of drying in this house. 

As I was saying, while that was drying I put up the rest of the wallpaper.

Just dated enough.  Not insane but I like it.
One more strip in the back to cover up the wiring tape.

Just the right touch to the walls.  I definitely didn't want this on the ceiling.  Too busy!
And we're all ready for a test run.

Swoops isn't thrilled.  There isn't enough room for him.

See?
He couldn't even fit through the door without squishing.

But it looks really nice.
Now to figure out the tub/shower fixtures, some towel racks...

All details for our next post.  Which has yet another built in project.

I think I might have a built in addiction.  I need help.   Seriously.


Wednesday, July 16, 2014

Hobby vs Obsession

So I think...I might have a problem.

It's a well known fact, at least by those who know me, that I have an addictive personality.  Examples of this include eating a carton of Oreos (or bag of potato chips, pint of ice cream, whatever) in one sitting, being unable to put a new book down until its done (reading until 2 in the morning when I have to be up at 5:30) or writing all night and into the morning when a new idea seizes me and won't let go.

For those of you who don't know me as well as the folks familiar with the above issues, or at least you haven't seen me in a while, I'm a fairly creative person.  In the house I have supplies for jewelry making, scrapbooking, sewing (by hand and machine) lots of yarn and embroidery silks.  It's rare that I look at something and don't think, 'I wonder what would happen if I did this with it?'  It's why I end up with so many ideas, tangents, daydreams(?) with fanfiction. 

On the dollhouse side of things its seeing something meant for a completely different purpose and thinking 'I bet I could use that in a dollhouse'.  For instance seeing a five gallon bucket on the side of the road makes me think of little people (ie Borrowers style) living inside it and how I could turn the bucket into a dollhouse.  You know, complete with dirt and a mound of leaves for it to be half hidden against/inside.

Living with felines just makes the whole concept more of a challenge.  I took the easy way out with the Gothic Victorian and built the plexiglass case.

Not pretty but functional
Someday I'll build a table or island for the room and get my dining room table back for other things.

The Beachside Bungalow is...more challenging because I don't have a case for it.  I may end up trying to build one, or a large cabinet to keep it in.  Or I'll just keep the back to the wall and hopefully the cats out of it.

You know, once the kitten can't poke her head into the windows.  She's small enough to climb right through.

But its the challenge that excites me.

For instance lately I'd been wondering how hard it would be to build a dollhouse that opened from the side on a hinge like the Fisher Price dollhouse.  Like this one, that I grew up with.

See? Self contained, with a handle to carry it around.

Not that I want to carry a 1:12 scale dollhouse around (though the idea has some appeal).  But the enclosed idea has its merits for someone with a kitten who thinks she's a miniature building inspector.

I got to the point of seriously thinking about it.  If I didn't build the house from scratch it would require some serious kit bashing (as I'm told the process is called).  for instance, the Beachside Bungalow would require two kits, with parts of the side walls cut off and a decision to wrap the porch around. (Which is very appealing.)

I'm also fairly interested (obsessed, addicted) in realism in dollhouses.  I like the idea of the space being used the way an actual family would.  So a lot of the ways dollhouses are set up irritate me.  How many 'real' houses have only one bathroom?  How many of them have only two or three rooms on one level?  Or have the bathroom in an area that isn't over the kitchen or laundry room.

My parents had an addition put on the house and so I got to see in person a lot of the things that go into making a house work from a practical standpoint.

So there's kit bashing and then there's getting blueprints/plans for an actual house and figuring out how to make it work as a dollhouse.  Or getting brave enough to draw out my own plans.

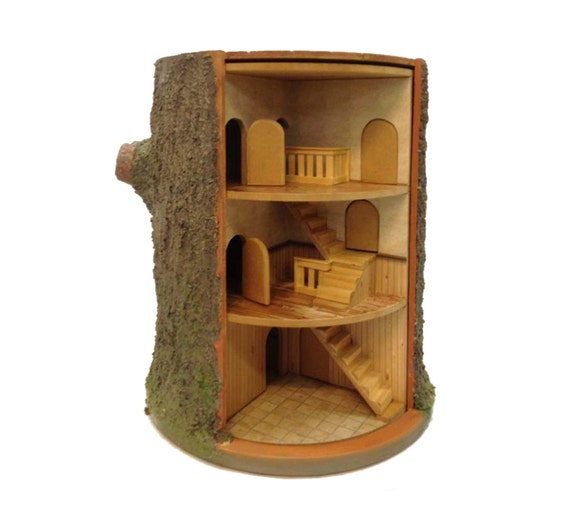
Then I saw these amazing people.  And suddenly I have a whole new idea of how to use the lazy susan I have sitting in a closet.

https://www.etsy.com/listing/156607477/revolving-dolls-house?ref=shop_home_feat_3

Revolving dolls house
I mean amazing!

So of course I'm thinking of ways I could do that.  An elven mage tower?  A small keep on the side of a mountain, guarding the pass?  Or a modern house with its own unique design.  Each has its merits.

Either way this hobby isn't dying off the way others have.  I take a rest now and then but I'm finding more and more interesting things to play with and turn into miniatures.  And building my own from scratch is getting more and more appealing.  Especially as I get better at finishing touches.

So my addictive/obsessive personality is... well.  Hopefully I'll figure out some things to make and possibly sell so I'm not buying tons of things with no point but to collect.  I've got some ideas for that too.

But when don't I have ideas...

My brain is dangerous I tell you.  Dangerous.

Tuesday, July 15, 2014

Tumbling Down

As in the walls came... or the Dollhouse as the case may be. 

Yep.  You heard me right.  The dollhouse ended up on the floor.  Splat.  With a very loud thump/crash.

How did this happen you might ask?  Oh don't worry. I'll tell you. 

In fair Denton where we lay our scene. From ancient grudge break to new mutiny... oops. Sorry that's Shakespeare.

Ahem.

So I was working on the front porch again.  Fixing some of the boards and getting the wiring glued into place with more beams/rafters.  In order to do this I need to have the house upside down.  There's no way I could do this work with the house right side up.  I'd end up needing a chiropractor. Again.

So far so good. Right?
I get most of the boards glued down, a few things held with binder clips and the wires glued into place.  And I decide to spackle/wood putty the holes in the wall closed.

See the hole above?  That needed to be closed.  It doesn't show from the inside but it looks awful on the outside.
 So I get everything nice and glued and spackled/wood puttied and I leave it that way to dry into place.
Another shot of the holes. There are three by the way.
In retrospect it might have been a mistake to go into the living room.  The dollhouse isn't meant to be balanced on the dormer and roof peak.  It has a nice solid base and is meant to sit right side up.

About half an hour later there was a very loud crash.  And a small white/calico cat streaking out of the dining room to hide in the guestroom.

I took a very deep breath and let it out.  And resigned myself to whatever disaster had occurred.  Jess got up with me and took a quick look.  Then he told me to get the camera because otherwise no one would believe what had happened.

I'll just show you.  A picture is worth a thousand words right?

Figure it out?
Here are a few more pictures to give you a better idea of the situation.

Please forgive the mess on the floor.  I'd say it doesn't always look that like but I'd be lying to your face. Computer screens.  Whatever. I'd be telling a blatant falsehood.

Getting a better idea of what happened?
Notice Swoops face down in a box.
You see Swoops had been here...

He was supervising.
I bet you've figured it out by now.
And here is our culprit.

Being held up for her mugshot. Tali Zorah Vas'Normandy
She loves to investigate the dollhouse and probably jumped from a spot on the desk to the top of it.  Which would be the base since it was inverted.  Being non too steady the whole thing overturned and crashed to the floor.

She freaked and ran.  Really who could blame her?  I'd run too.  And we got up to figure out what had happened.  Jess said he wished we had motion capture cameras so we could see the look on her face when it all started to fall over.  Slo mo kitty cat panic face.

But there was only a little part damaged and that's easily fixable.  The rear right corner of the roof got bent but with some glue and another binder clip to hold it in place it'll be fine. 

I was actually pretty impressed that the house held up so well.  It doesn't have nails in the construction, it's all glue.  (And paint.)  But it didn't fall apart upon impact and that's a pretty good endorsement of how well it's made.

So that was our adventure on Saturday morning.

I worked on the dollhouse a bunch the rest of the day and Sunday too and made some real progress to show you in my next post.

By the way, it took Tali until Sunday night to climb back on the desk and inspect the house.  Thankfully it was right side up and she decided to leave it that way.

See you all next time.


Wednesday, July 9, 2014

Small Accomplishments

No pun intended. 

A lot got done this past weekend.  Three days of sleeping, crafting and screwing around with the dollhouse while watching Wimbledon.  Jess is a huge Wimbledon fan.  None of the people we really like won but the matches were still pretty good.

The first project was the washstand for the bathroom.  I wanted something that looked a little older but like someone had attempted to update it.  So break out the spare balsa wood and newel posts.


Lots of scrap wood went into this.
 And then I didn't like how the legs looked.  So I took them off and turned them upside down.

 I added trim to the back and a lower shelf after I switched the legs and I really liked how it looked.


A little blurry but you get the idea.

More glue though.  This was too small for me to use nails.  and since I'd taken the top knobs off the newel posts it ended up a bit short.  So I glued them back on. 

Then I painted the whole thing.  I started out with white but I didn't care for how it looked.  So I painted it the same blue as the walls.  I don't plan on having the bathroom entirely that color so I think it'll stand out nicely.

I wanted to use a scallop shell for the basin.  It's a fairly modern look that I really like but the trick was finding a shell shallow enough but also decently symmetrical.  I ended up buying some shells at Joann's.  My pal Linda (remember Linda? My home improvement/woodwork expert?) brought me some from her trip but they were all very deep and I wasn't sold on the idea of making a hole in the top of the stand to sink the shell into.

But we did have fun picking out shells from the bags I'd bought.  There are some tiny ones that'll be great to put into a little bowl on the coffee table. 

What I ended up doing was making a little wooden riser out of some scrap wood and the ends of the tongue depressors.  I had several graduated lengths with curves on the ends so it ended up looking pretty good.

The pale blue of the paint was great overall but I really wanted something to look a bit like Formica for the top.  It just seemed like something you'd find in an old semi updated bathroom you know?  So I pulled out some pale blue shimmery nail polish.  And it worked pretty well.  It's darker in some spots and lighter in others with a gleam overall.  And it reminds me of an old sixties bathroom with the weird 'marbled' Formica counter tops.

Took several pictures of the whole thing.  See what all of you think.

See? 
I'll tell you, thank God for Sticky Tacky Glue.  Stuck the shell and faucets on really well.
You can barely see the riser I made for the faucet.
Here's a better view. 
The washstand turned out pretty well but it took a couple weeks with the glue setting and me figuring out how to do it.


So the next project was something for the bedroom.  I'd wanted to do a built in next to the stairs.  And I really wanted to make use of the space that goes under the eaves of the second floor.  I toyed with the idea of a step/stair type of bookcase but in the end I went with something else.

I took some paper and pressed it into the corner to get the angle right. (Well mostly right).  And then used that to draw out the shelves.

Believe it or not this helped.

I used the drawing to keep my boards in the right place.  Well, the drawing and tape.  I used the one inch balsa wood I got from Hobby Lobby so the shelves would be deeper than the built ins down in the living room.

More tape and glue.  This is a glue heavy dollhouse I'm telling you.
Eventually I got the shelves off the paper.  The glue stuck them to it a bit but sooner or later...

Voila!

See?  Shelves. 
I wanted some drawers for the bottom three shelves.  So I got some of my scrap wood and started to measure that out.  More glue.  Yay.  (Sarcasm.  Can you tell? LOL)

The trick was getting everything the right size.
And then do a dry fit.

Here we are with the first two drawers.
And then I got the third working.

So not bad so far right?
And everything seemed to fit in the corner pretty well.

The natural wood looks nice too doesn't it?

Then I painted it.  I wanted these to be white like the ones down stairs.  But I needed something for handles.  So I dug out some of my wooden beads.  And once I got everything painted and the shelves glued into place I sanded the sides of the drawers so everything slid in and out nicely.

So there was some touch up painting to do but that wasn't hard.  Glued on my beads for handles and suddenly the bedroom has some extra storage.

I didn't put dividers in the shelves because I wanted to slide the top two drawers over.
It doesn't look too bad does it?  Just enough room next to the stairs opening for a newel post and railing.  Definitely need that.

Next project was something else I've had in mind.  Never did it before so I had to work out the kinks of my process.  But some seventy nine cent buckets from Hobby Lobby, flowers and florist foam from Joann's and mulch from Miniatures.com and I was set. 

Oh and glue.  Let's not forget the glue.  Good old Elmers.

But the end result is pretty good.  Something for the front porch when I've got the house a little more completed.

Two lilac(?)/purple pink and one blue. 
See?

Cheerful right?
Swoops seems to approve.  He's very intent upon investigating them.
They look pretty nice.
I figure one on either side of the steps and one on the open porch post.

I might make a few more when I get more buckets or flower pots.  We'll see.
One last big project... This took me pretty much all day Saturday.  Good thing we had movies to watch. 

I won't bore you with the details except to say it involved a lot of the fabric I bought.

So here we are.  A bed.  Nice, normal.  A little plain though, wouldn't you say?

Nice bed. But kinda boring.
Let's add a fitted sheet and a dust ruffle.  See if that jazzes it up some.

Needs a little adjusting but not bad.
Now for a top sheet. 
Nice rich brown for contrast.
And a comforter.  No fireplace on this floor so it could get cold.

Don't forget to fold everything over so the lace shows.
Add the big pillows.

Something to support your back while reading.
And another pillow.  Not quite the right size so this needs to be adjusted.  We've got two but we need to downsize.  These are Barbie size right now.  Need to scale back.

Still like the look of the whole thing.
Let's try another look.


See? Pretty.

Comforter seems a little oversized but it'll be nice when it's cold.

Here's a little something.  Put everything in downstairs just to see how it works with the stairs in?  Yeah the kitchen island is wayyyyyy too big for the space.  It does not work.

But I have a drop leaf table that only needs a little paint to fit in with the rest of the room.  And it fits much better.

See?  Better for the space but a little dark.

But the living room portion looks great with the new chair and coffee table.  Just need to get sewing on the day bed and make the trundle. 

See?  Look how cute the chairs are together.
And the coffee table will be perfect with a little bowl of shells.

See how pretty?
I got the bowl from a seller on Ebay.  http://stores.ebay.com/Dollhouse-Miniatures-Wood-Turnings?_trksid=p2047675.l2563  The work is gorgeous and unique.  I confess, I think I spent a little too much since I got the bowl and a couple of vases as well.

The shells came in the bag I bought from Joann's.  They had a ton of different sizes and a bunch (like a handful at least) of teeny weeny shells.  Perfect for the dollhouse.

Here are a few more pictures.


And that will be all for the day folks.  Lots of little things but nothing huge.