Sunday, August 27, 2017

Walls, Floors & Hardware

Not necessarily in that order. 

I started my weekend by finishing my kitchen ceiling light fixture.  I picked up some coffee stirrer straws at work and they were even black so I didn't have to paint them or anything.  Happy chance right?  And I remembered to take a picture of my entry way light fixture.


I was at a point where I really couldn't put off gluing the walls together anymore.  But before I did I needed to make a template for my backsplash.

I had to do a dry fit of the kitchen. Again.  But I added the bronze handles and drawer pulls to the cabinets.  I like the contrast with the dark hardware.


I also took the brass pulls off the island table and replaced them with bronze as well.


Once I got that done I glued my walls together and started to lay out my backsplash.


It is not easy to cut ceramic beads in half.  My arms hurt again.

There was a lot of waiting this weekend, for glue or stain or whatever to dry so I tried to stagger things out.  While glue is drying work on tiles, while tiles are drying work on the floors.  While the floor stain dries work on the bathroom lights.

After wiring the lights together and forgetting the plug I cut the wires and managed to do it right on my second attempt.  Rather than have pendant lights beside the mirror I just put two ceiling lights.


I plan on hiding the battery in the sink cabinet.  I might just be lazy and cut a bigger hole in the wall so I don't have to take the plug off the wires.  That's the worst part of the wiring for me, besides figuring out the order.

You can see the floors in the pictures above.  Here's a better one.


I used the Minwax Red Oak stain stick and then layered American Cherry over it. I like the look.  It's close to the color of the built ins but a bit darker.

I've been going nuts trying to figure out what to use as a countertop.  I want the backsplash to stand out, hence the neutral cabinets.  So I went with a cream colored countertop. 

Then I glued everything in.  I had to keep the bathroom in place so I wouldn't move the last cabinet out of place.  And I had to make sure everything fit in the way it was supposed to.  Lots of praying and cursing.  It was an interesting hour.

But everything is in. Finally.


I got a chair and tested the height of the desk before I glued it in and I'm pretty happy with it.  It's so small I decided against putting a lamp on it though.

Last touch was the faucet.


I'm debating on adding grout or not.  I kind of like how it looks without.  And I need to make a little curtain to hide the underside of the sink.

Now I need to figure out the next step.  Who knows what that'll be.  I've got the bathroom to finish, furniture for the living room to make and cushions for the window seat.  And I need to figure out a way to make candles for the fireplace if I decide against using my embers.  The murphy bed has no bedding and I need some sort of coat and shoe storage for the entryway.

Lots to do!  I'd better start making a list.

Wednesday, August 23, 2017

Then & Now

Just a quick comparison post.

Here we have little Cap'n Jack Sparrow.  Very young, maybe six months? Right after he first came to us.

Helo and Jack on the couch

Jack and Tali in the chair

Jack and Miho (who he thinks is his kitty mom)


Notice the size of his paws.

Here are a few of Cap'n Jack Sparrow now.


Jack and Tali in the same chair.

Mom, I think this chair shrank

Jack (on the lower half) and Helo (on the upper portion) 

Jack is actually slightly bigger than Helo now.  He's still a sweetheart who thinks the girls are the coolest and the only time he ever gets mad is when Helo is being mean to Miho.  Then he tries to protect his kitty mom and jumps Helo.


Sunday, August 20, 2017

Getting Ready To Glue

We've talked about the face that I really have no clue about the order everything should be done. Right?  My ignorance is firmly established in your minds?

Well I think I got the order in which I need to do things down. At least for this house.

I got the walls routed out so I have a place to hide the wires. 


And I got the floor notched out so the wires would go through them. 

I textured and painted the walls.  But I forgot to take a picture of them so you might see that in the background of the next pictures.

I know from experience that trying to do certain things is almost impossible with the walls up.  And other things can't be done until I get the walls and floor in place. 

But before I can glue anything into place permanently I have to have most of the lights in place and the patched up to hid the wires.

I needed a light fixture for the kitchen.  So I spent most of Saturday and part of Sunday morning making one.  I need to get some coffee stirrer straws to finish it and hide the wires going from the lanterns to the ceiling panel but hopefully you'll get the idea.


I'd bought a couple of lamps and used the shades to make sconces and glued them to the wall beside the picture window.


They'll provide some light beside the window.  You can see some of the texture I added here.  I think it gives the walls some interest visually.  I used another lamp shade to make a ceiling fixture and I'll add that to the entryway.  Again, no picture, sorry. I was really absentminded.

I want to be able to finish the bathroom so I worked on a shower curtain but I'm not sure I like it or not.  I did get a toilet paper roll made and the holder glued to the side of the sink.


I couldn't find any mirrors that I thought looked like they belonged in the house so I got some scrap wood and plastic mirror sheeting and made one.


The last thing I managed to get done this weekend was painting the kitchen cabinets and adding the hood for over the stove.  Once they're dry I'll add the hardware to them.


Once I get the hardware on, I'll need to measure and do a test run of the backsplash and countertop.  I think I'll be able to put them on if I can get two walls glued together and the floor dry fit.

But hopefully it will go smoothly.

How is everyone else doing?

Saturday, August 12, 2017

Making Furniture

Well this morning I knew I couldn't do anything really big because the husband had a work thing that involved the city library van which meant I needed to pick him up and take him back to his car.  So doing anything that couldn't stand interruption was right out.

So I made some more furniture and redid the wheels on my barn door. 

It occurred to me that I needed a cabinet to keep pillows in so I nuked a hutch cabinet and removed the shelves from the top.  I didn't like the brass hardware so I replaced it with bronze and added some casters to the bottom.  I painted it with the same paint as the bathroom walls and then sanded the edges so it'll look a little worn out.

The idea is that all the furniture in the loft can be moved around except the murphy bed which'll fold up.


The next project started up because it occurred to me that our resident had no where to hang clothing.  Of course now I'll need to make some clothing and hangers.

But I started with the moving closet.  I took legs from a couple of House of Miniature candle stand kits and some pieces of wood.  I used my dremel sanding head to add some curves and stained everything with cherry stain.  Some brass pipe lengths and nails to make the rails and finish the ends and I had a clothing rack.  I added casters to the bottom so it could be pushed out of the way when necessary.


Now I'll be looking up tutorials on how to make mini clothing on hangers but at least I have something to hang them on.

The wheels for my barn door had gotten loose and so the door was hanging oddly.  Makin some thicker wheel braces and using toothpicks for the nails and axle seems to have done the trick.


It's a little weird in the picture, I wonder if I hung it wobbly.

The only other thing I did was paint the bathroom fittings I ordered from Shapeways.  I painted them the same way I had the shower and sink fixtures, with some metallic bronze.


I may add a bit more of the black to give the hangers some definition but I'm not sure yet. 

But that's been my Saturday so far. 

Here's a couple of shots of the loft.

One with the murphy bed up:


And one with it down:


I think since I've pretty much got the layout down I'll end up taking the house apart tomorrow so I can rout out the wire paths and start finishing the interior.  I'm not looking forward to this.  I'm still trying to figure out how to hide the wiring when I'm not using wallpaper.

Oh well.  Have to bite the bullet sometime.  Hope everyone else is having a good weekend!

Sunday, August 6, 2017

My Arms Are Tired

Because I just flew in from Vegas... badum bump.  Always makes my husband laugh.  But we're kind of nerds.

The reason my arms are tired is because I don't have a table saw.

Maybe I should start from the beginning.  We had to buy new mattresses, and while we did that I talked my husband into finally getting a headboard for the bed.  But the bedside tables we had wouldn't fit.

To be honest I didn't mind that much, they were beat up and the drawers wouldn't close properly.  So I found some new ones cheap and put them together.
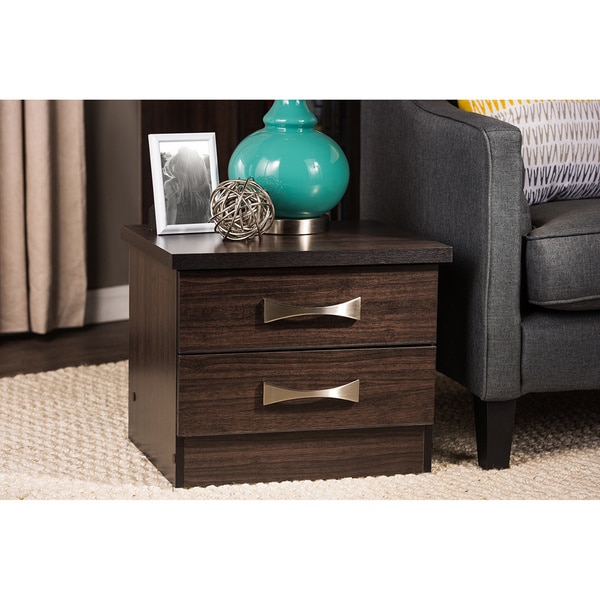
Colburn Modern and Contemporary 2-Drawer Dark Brown Finish Wood Storage Nightstand Bedside Table
My husband liked that the drawers worked but they were very short, less than sixteen inches tall.  He hated that. 

So I spent some time trying to figure out how to make them taller.  Home Depot to the rescue.  I found some table legs and braces that would work.

Waddell 7.5 in. Wood Round Taper Table Leg

The only issue was that because of how the nightstands were made there was no place to attach the back half of the braces.  So I bought a length of wood I could cut to the right height.  Hence the sore arms. 

But once I got that done the rest was smooth sailing. 


Apart from a Siamese deciding she wanted to be part of the photo shoot. 

But after I got all that done I had to clean up the mess of sawdust and empty packages and tags.  And I was free to start working on miniature furniture again. 


I started with the House Of Miniature's kit bachelor chest.  I want to use it as a bedside table.  (Sort of the weekend theme.) 

I didn't really do much bashing to it other than adding casters to the bottom so I could roll it from side to side.  And I changed the handles to look a bit more modern.  I used a Minwax stain pen in Ebony to give it a bit of a change from the cherry I used on the murphy bed.


I don't think it turned out too badly. 

But I doubt I'll get much else accomplished this weekend.  How is everyone else doing?